Tutorial: Automatically mine when computer is locked on Windows
Note: This tutorial is created with Windows 7 in mind. The exact steps are likely different for other versions of Windows. In addition, any text surrounded by quotes is to be entered without quotes.
If you want to mine Bitcoins, but also need to use your computer for other GPU-intensive tasks like gaming, it can be annoying to start mining each time you stop using your computer. On Microsoft Windows, there is a little-known way to automate tasks like this. For this tutorial, we will be using CGMiner. If you don't already have it, download it from here, and extract it to a folder somewhere on your hard drive.
Configuring the security auditing settings

Windows keeps a log of various types of events that occur on your computer. These events include software crashes and system service notifications, among other things. This event log is closely tied to another feature of Windows known as security auditing. Basically, every time certain tasks are performed that require user authentication, such as logging on to your computer, it creates a log entry. This feature is designed mainly for professionals who need to monitor corporate networks, but it can be useful for this purpose too. How? It is possible to program Windows to run programs whenever specific types of events occur.
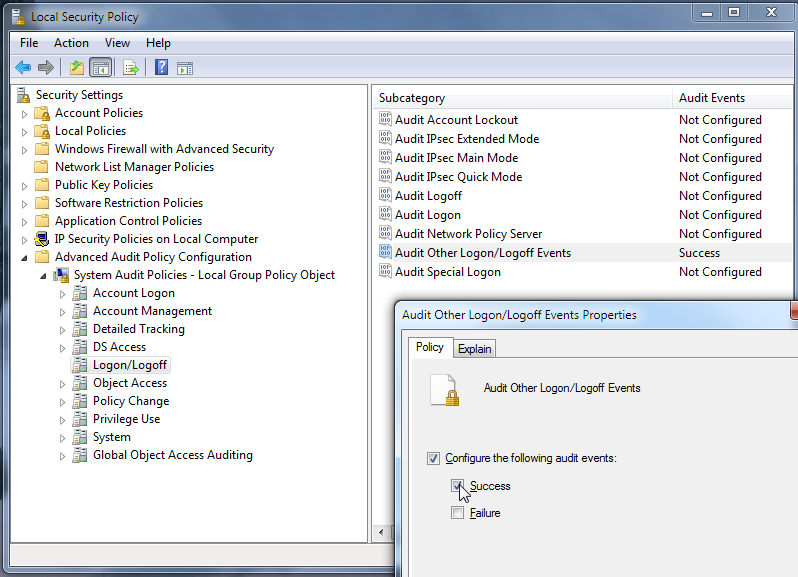
Locking and unlocking your computer are two things that Windows can log, but by default it is not configured to do so. To enable this:
- Open the Run dialog (Windows+R) and type "secpol.msc".
- On the left, expand "Advanced Audit Policy Configuration", "System Audit Policies - Local Group Policy Object", and select "Logon/Logoff".
- On the right, double-click "Audit Other Logon/Logoff Events".
- In the dialog that appears, make sure "Configure the following audit events" and "Success" are checked.
- Click OK, and close the Local Security Policy window.
Using the Task Scheduler
Next, we need to tell Windows to respond to these events. There are two tasks we need to program: one to start mining when the computer is locked, and one to stop mining when the computer is unlocked.
Start mining when the computer is locked
- Open the Run dialog (Windows+R) and type "taskschd.msc".
- On the very right, select "Create Basic Task..." from the menu.
- Give it a name, such as "Start Bitcoin Mining". What exactly you type here doesn't matter, as long as you remember what it is in case you need to change something later. Click Next.
- Select "When a specific event is logged" from the list, and click Next.
- For "Log", select "Security". For "Source", select "Microsoft Windows security auditing." For "Event ID", type 4800. Click Next.
- Select "Start a program" from the list, and click Next.
- For "Program/script", click "Browse..." and select cgminer.exe. (You do remember where you extracted it, right?)
- For "Add arguments (optional)", type in the command line parameters. Make sure to add
--api-listen --api-allow W:127.0.0.1to the end.- If you're unfamiliar with cgminer, you can use the following template:
-o [pool server] -u [user/worker name] -p [password] --api-listen --api-allow W:127.0.0.1
- If you're unfamiliar with cgminer, you can use the following template:
- Click Next, and then Finish.
Stop mining when the computer is unlocked
To stop cgminer when the computer is unlocked is trickier than it might seem. On my computer (and likely others as well) simply killing the process causes the video driver to temporarily stop responding. This can cause other applications to crash, and it's also just annoying as you need to wait 10 seconds or more to use your computer. For obvious reasons, it would be VERY annoying to have this happen every time you unlock your computer. (Even if this exact problem doesn't occur, cgminer may need to "clean up" when it's done, so it's best to use this method anyway.)
Luckily, cgminer provides an API to allow other applications to control it. All we need to do is send the command "quit" to the local computer on network port 4028. For this, we'll use a program called netcat. Download this, and extract "nc.exe" to your cgminer directory.
Now we need to create two new files in this directory. Open Notepad, and type the word "quit". Do NOT press Enter afterwards. For some strange reason, cgminer doesn't accept commands ending in a newline character. This is why we need to create a file in the first place, rather than simply using the echo command. Save the file to your cgminer directory as "quit.txt".
Click File→New, and type the following:
@echo off
nc 127.0.0.1 4028 < quit.txt
Save the file in the same directory as "quit.bat".
Now we need to schedule a new task. Do this the same way as you did before, with a few differences:
- Type a different name (should be obvious)
- Instead of 4800, enter 4801 for the event ID.
- For "Program/script", select the "quit.bat" you just created instead of "cgminer.exe".
- Leave "Add arguments (optional)" blank, and select the cgminer directory for "Start in (optional)".
You're done!
Lock your computer (Windows+L), wait 15 seconds or so, and unlock it. While it's locked, you should hear your GPU fan start spinning. When you unlock your computer, you should see cgminer appear for a second, then exit.
If it didn't work properly, leave a comment on this article's talk page, or send an email to flarn2006@gmail.com. If it did, great!